
Unlike that relic in your parent’s used to have, new TVs offer myriad options beyond color and contrast controls. If all you do is unbox your new TV and put it on the wall, you’ll be missing out on all that your new TV has to offer. So try these tips to make sure that new television is performing its best and, delivering a stunning HD picture.
1. Don’t overuse motion enhancements
This applies mostly to LED/LCD sets, which in 2010 represented a market 10 times the size of plasma display, and that market is still growing. The feature is designed to improve the stuttering sometimes seen on LCD TVs during motions scenes. You may see it listed as a Hz specification (120Hz, 240Hz …) or a clever marketing name (TruMotion, Motion Plus, MotionFlow, CineMotion, and so on) but when left to run unchecked, this setting could leave you wondering what all the hype over HD is about. Be careful, some sets might even have two different motion enhancement settings.
At its most basic, the idea behind this technology is to reduce blur and pixilation in fast-moving action. Older model LCDs used to be known for something called the “screen door effect”, when the picture would break down during sporting events or high action scenes. Better refresh rates have helped to curb this issue in newer LCD/LED sets, even without the use of motion smoothing technology.
When turned on, especially to its highest setting, motion smoothing can turn a picture hyper-realistic, making film-based material look like a 1980s sitcom. Start with these enhancements turned “Off” and if you feel that your picture is struggling to keep up with fast action, slowly increase the setting.
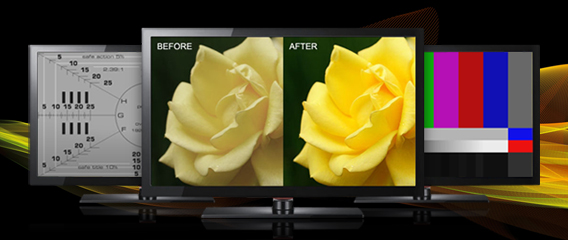
2. Watch the material how it was meant to be seen
Filmmakers spend a lot of time tweaking their material to get it exactly how they want it. In an ideal world, your TV would simply be a conduit to view that perfect picture. Since each set is calibrated differently at the factory, that’s sadly not the case.
In addition to motion enhancements, there are several other picture tools that can negatively affect a TV’s output if left to their highest settings.
Locate and either disable or set to “0” any noise reduction or mosquito noise, edge enhancement, skin tone, or shadow detail enhancements when you first set your TV up.
You may eventually switch some of these options back on, but when they are all on at the same time (as is the case sometimes right out of the box) the alterations to the native picture can be too strong.
3. Turn down the lights
TV brightness and color settings are often turned way up as on TVs out of the box. However, in your home those settings might not be ideal for regular viewing. Almost every TV will come with a series of viewing scenes with names like “vivid”, “theater” or “standard”. The theater setting generally provides the best picture right out of the box (unless you have a THX certified TV, in which case choose that setting). It’s best to avoid the “vivid” or “game” setting for regular viewing.
One note when setting up a new TV: Be sure to give your eyes a chance to get used to any major changes you make to the picture. Watch for a couple days and if you’re still not happy, tinker some more, but avoid making snap judgments.
If you’re looking to take things to the next level, there are several discs available for purchase that will walk you through a self-calibration (such as Digital Video Essentials, Disney’s WOW, and Spears and Munsil).
Source: HDLiving